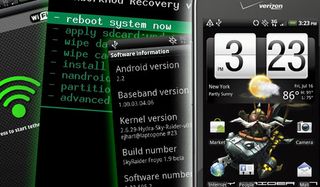
(Update 3: If you've already gotten the OTA update to Android 2.2 for your Incredible, the latest version of Unrevoked will still give you root access--as of right now, it's been pulled down, but there's numerous ways to keep updated.)
(Update 2: As commentors Asad and Mark pointed out, the latest ROMs require a radio update. Both guys posted some very helpful links down in the comments section.)
(Update: There's now a working Android 2.2 ROM available for the Incredible that gives you a complete version of Froyo.)
On Wednesday, the folks over at Unrevoked released a package that makes it easy to root the Droid Incredible (along with several other HTC phones, including the EVO 4G and Aria). But what does all this mean, exactly?
Last week, we ran through how to install Froyo on a Motorola Droid. While the Incredible technically had a rooting solution available since June, Unrevoked’s package now makes it a breeze to install Froyo on the phone.
A quick warning: when it comes to playing around with your phone’s internals, there’s always the risk of turning your Incredible into a $199 paperweight, so remember to make a backup and follow the instructions. Once you root your Incredible, it’s easy to install a custom ROM and for this guide, we’re going to use Sky Raider, a Froyo ROM made by xda-developers forum member ihtfp69.
Checklist:
Stay in the know with Laptop Mag
Get our in-depth reviews, helpful tips, great deals, and the biggest news stories delivered to your inbox.
- HTC Droid Incredible running stock Android 2.1
- Unrevoked v3.1 package (Versions exist for Mac, Linux and Windows, but for the guide, we went with Windows—the general process is still the same, so just adjust the directions accordingly if you’re on a different platform)
- A custom ROM (You can find Sky Raider here)
- Unrevoked modified USB driver (which you can find here)
Part One: Phone Setup and Root
1. Download Unrevoked's modified USB driver. Save it somewhere that's easy to locate.
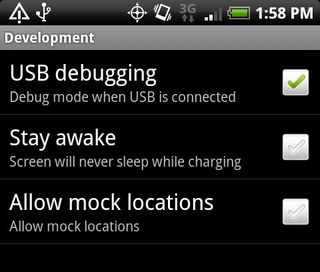
2. Set the Incredible to debug mode. Under Settings, go to Applications and then Development. Plug in the phone.
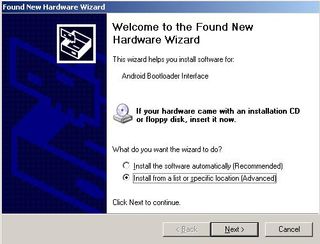
3. Connect the phone to your PC and install the first driver. A Found New Hardware Wizard window will pop up here—direct the window to the folder where the USB driver is located and run through the wizard.
4. Go to HBOOT. Turn off the phone and once it's off, hold down the volume down and power button to boot into the HBOOT menu.
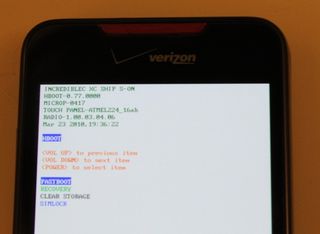
5. Install the second driver. While still in HBOOT mode, plug in the phone again to bring up another Found New Hardware Wizard window. Again, direct the wizard to the USB driver's folder and let it go automatically.
6. Open the package and launch reflash.exe. Unzip the Unrevoked package into a folder and look for reflash.exe. Here’s the easiest part of the whole guide. Launch reflash.exe and let the client run automatically. Once it’s done, congratulations—your Incredible now has root!

Part Two: Installing Froyo
Besides root, Unrevoked also also installs ClockworkMod Recovery, a handy replacement to the default recovery client. When you're installing the ROM, you'll be spending a lot of there, so it'd be worthwhile to familiarize yourself its functions.
1. Back up any files through Windows. You'll be doing a full wipe, so save any files from your phone (ex: photos and videos) you want for later on your PC.
2. Download Sky Raider. Download Sky Raider 1.7 (click here) and save the zip file directly onto the phone's SD Card. Later on, you will be able to update to the latest version of Sky Raider.
3. Boot into ClockworkMod. Boot into HBOOT again by holding down power and volume down once the phone is off. Scroll down and select recovery to boot into ClockworkMod.
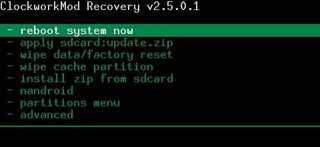
4. Make a backup in Nandroid. Nandroid is a backup management tool that's included in ClockwordMod. Select Nandroid via the trackball and hit Backup to make a recovery image of the phone, in case anything goes wrong later.
5. Wipe data. Press the option on ClockworkMod's main menu to clean off the phone.
6. Install the ROM. Select "Install ZIP from sdcard" to pull up a listing of the SD Card's contents. Select the ZIP file and confirm to install.

Give the installer a few minutes and once you see the screen below, your phone has been updated.
7. Update to the latest Sky Raider ROM version. After you've installed 1.7, it's time to upgrade to the latest version (as of this writing, 1.9). To do so, you must download the appropriate zip file, store it on your SD card, and repeat steps 3 to 7 above, though you do not need to wipe the phone. The latest Sky Raider update is available here.
How It Works
We installed Sky Raider 1.9 on our Droid Incredible and were impressed with the results, but many features aren't available yet, since the ROM's still in beta. Sky Raider's developer, ihtfp69, says that LED notifications, the Mobile WiFi hotspot and camera aren't yet shipshape. However, we were able to play Flash content on several websites. Embeded YouTube videos and embedded Flash content on laptopmag.com and homestarrunner.com worked fine, but we didn't have any success playing video on thedailyshow.com. USB tethering also worked equally well, but with 3G's limitations, there was still a significant performance bottleneck.
Still, even if the ROM development scene for the Incredible is pretty young—Sky Raider's first release was on July 10—it's definitely good to know that the community's more than capable of picking up and improving the phone beyond the Android 2.1 installation it comes with. If you're feeling daring enough, try out our guide and let us know how it goes in the comments.
(Very, very special thanks to ihtfp69, xda-developers.com and Unrevoked)
Open the package and launch reflash.exe. Unzip the Unrevoked package into a folder and look for reflash.exe. Here’s the easiest part of the whole guide. Launch reflash.exe and let the client run automatically. Once it’s done, congratulations—your Incredible now has root!
