5 Essential Tips Every Barnes & Noble Nook Owner Should Know

We recently let you in on our essential tips for the Amazon Kindle and now it's the Barnes & Noble Nook's turn. Discover new features of your Nook that you may not know about. For instance, did you know that you can read eBooks from your local library on the Nook? Or that you can lend eBooks to your friends?
Read below for tips on getting the most out of your Nook eReader.
Read eBooks in the store.

With the newest Nook software update, Barnes & Noble gave users the ability to read eBooks while in physical stores. Not all eBooks have this feature enabled, but the bookseller informed us that the majority of their online catalog was available as of press time. Free reading is limited to an hour per day, but that’s plenty of time to get a taste beyond the free sample pages most books offer. Some page turns will take a little longer when reading in the store, as the Nook loads only a few pages at once. Otherwise, you’ll get the same reading experience as you would from a book you own.
- Go to a B&N retail location, and tap the Shop icon on your Nook. Once the eReader notices it’s in range of the store’s Wi-Fi signal, it will connect; and a B&N logo will appear at the top of the display.
- Search the eBook store to find the title you want to read and tap to open the Details screen.
- If the book is available, one of the options on the LCD screen will be Read In Store. Tap this to download the book for reading.
Manage your library online.

If your eBook library gets a bit unwieldy and hard to manage from the Nook itself, you can organize it via your BN.com account interface. From here you can choose which books to archive (store online, but not on the Nook) or delete altogether. You can also purchase titles here and sync them to your Nook or smart phone app later.
Lend books to friends.
Stay in the know with Laptop Mag
Get our in-depth reviews, helpful tips, great deals, and the biggest news stories delivered to your inbox.

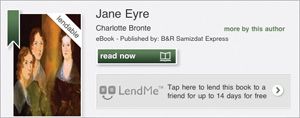
Currently the Nook is the only eReader that will allow users to lend DRM eBooks to other people, but only those with a Barnes & Noble account and for books with this feature enabled (about half the catalog). And now you can use the LendMe feature on the apps for the iPad, iPhone, and Android devices in addition to the Nook. The lending period lasts for 14 days, then the book automatically reverts back to the owner. There’s one catch, though: You can lend a book only once, and you can’t send it to a second friend or re-lend it again. So choose who you lend to carefully.
- Highlight the book you want to lend from inside your library, then select “View item details & options”.
- If the book is lendable, you’ll see an option to lend on the list.
- Select an existing friend/contact on your list or enter the e-mail address of the person you’re lending to. If that person has an existing Barnes & Noble/Nook account, use that e-mail address. If they don’t, the bookseller will prompt them to create an account in order to read the book.
- Tap Submit > Confirm to send the LendMe request to your contact. The recipient has seven days to accept the book.
- After the 14-day loan period is over, or after the offer expires in seven days, the book will become available in your library again automatically.
Load public library books.

Library systems across the country are now lending eBooks in addition to physical ones, and you can read many of them on your Nook as well as any of Sony’s new eReaders and Kobo’s device. However, this doesn’t currently hold true for the Kindle or the iPad. Your local library will have specific instructions for finding and downloading eBooks from their system, but here are basic steps and tips that will apply to most libraries:
- Create a free account at Adobe.com, then download and install the Adobe Digital Editions Software from www.adobe.com/products/digitaleditions.
- Authorize your PC (Library > Authorize Your Computer) using the Adobe ID you created.
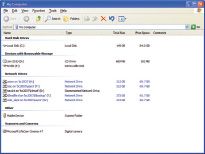
- Connect your Nook to your computer via USB. An icon for the device will appear in the right sidebar of the Digital Editions window, and the software will prompt you to authorize the eReader.
- Download eBooks from your local library in EPUB format.
- Click Library > Add Item To Library, and navigate to the folder where you saved the loaned eBooks. Now they will appear in the library on Digital Editions.
- Drag the book cover over to the Nook icon and drop it once you see the green “+” sign next to the cursor arrow.
- Disconnect the Nook, then go to My Library > View My Documents. Even though the titles from your local library are books, the Nook puts non–Barnes & Noble files in the My Documents folder.
- With some library systems, the Adobe Digital Editions library will display a banner on the cover of loaned books that indicates how many days you have left in the loan.
- Once your loan period is over, you won’t be able to access the eBook. And when you connect with your PC again, ADE will automatically remove the book from the My Documents listing.
Add your own pictures to the screensaver.

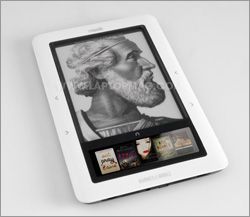
Like the Kindle, the Nook shows a rotating roster of famous author images by default whenever you put the eReader to sleep. But the Nook allows users to change the set of images to three preloaded groups and gives you the ability to upload your own. Add your favorite book covers, pictures of your kids, or anything else you decide.
- Create a folder for the images you want to use on your computer. Name it something identifiable like “My Kids” or “Pictures From Paris” since this is the name that will show up on the Nook.
- Add pictures in JPEG or PNG format to the folder. Note: for best results, crop or resize the images to 600 x 800 pixels so they will fill the screen. No need to make them black and white—the Nook will do that for you. The higher the dpi, the better.
- Connect the Nook to your computer via USB, then navigate to the folder you created.
- Drag and drop the folder with your images into My Screensavers.
- Disconnect, then go to Settings > Display > Screensaver on the Nook and you’ll see the names of the folder(s) you uploaded on the list of options.
- The Nook will choose an image at random from the selected folder to display. For more control, create multiple folders with different types of images.
